The Preferences dialog can now be resized like most other Opus dialogs.
This option lets you configure the colors that are used to highlight text matches in filenames when using the Find-as-you-Type field (and the File Displays / Find-As-You-Type / Highlight matches option is turned on).
This lets you configure the font used for the Jobs Bar.
The new Default width option lets you configure a default width for every field. This is especially useful in configuring the default width of the new Thumbnail column.
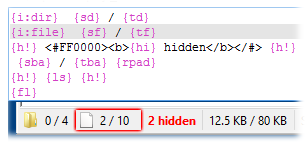
The Status Bar page has been redesigned to reflect the new dual status bar options.
- Use two independent status bars when in dual display
mode
In Opus 10 a dual-display Lister only had one status bar that was shared between the two file displays. When this option is turned on, a dual-display Lister will have two separate status bars.
- Keep status bars at the bottom of the Lister
By default status bars are attached to the file display - if you turn this option back on they revert to the Opus 10 behavior where the status bar was attached to the bottom of the Lister window. The Glass background option is only available if this option is turned on.
- Separate definitions for...
The meaning of this option changes depending on the state of the Use two independent status bars option. With two independent status bars enabled, the Separate definitions option lets you configure a separate definition for the left/top and right/bottom file displays. With two independent status bars disabled, the Separate definitions option lets you configure a separate definition for the status bar when it is in a single-display Lister and a dual-display Lister.

The text field that you use to configure the status bar definition has been enhanced to provide syntax coloring of status bar codes, and the preview below lets you easily see which part of the status bar you're currently editing.
The Details and Power Mode pages both have options relating to the new Thumbnail column. Hide icons when thumbnail column is visible causes the file icons to be hidden automatically whenever the Thumbnail column is added to the file display. Thumbnail column aspect ratio lets you control the aspect ratio used to calculate the height of each row when the Thumbnail column is present - the row height will be calculated based on the width of the column and the specified aspect ratio. The Show thumbnail borders option lets you control whether thumbnails in the Thumbnail column are displayed with borders, and to set the color used to fill the interior of the border.
This page is new, although the options on it are not. These options relate to the configurable mouse buttons in Power mode and have been split off from the Power Mode page to their own page.
This page lets you configure a toolbar or toolbar set that will be turned on automatically whenever a file display is set to the specified display mode. By default Opus uses this to show the Images toolbar whenever the file display is in Thumbnails mode. In a dual-display Lister, the toolbar for a particular mode will be displayed when either file display is in that mode - if you want the toolbar to be shown only when the source file display is in that mode, turn off the In a dual-display Lister, activate toolbar when either file display is in that mode option.
This page has been updated to control the new file display toolbar options.
- Display as a toolbar enables the use of a toolbar in the File Display Border, and the drop-down lets you select which toolbar is used for this purpose (by default the toolbar is called File Display).
- If the Click on destination's toolbar only changes state option is turned on, clicking on a toolbar button in the destination file display will set that file display to source but not trigger the actual button you clicked on.
- Display as a static header reverts the file display border to the previous status header from Opus 10 (disabling the use of a toolbar).
- Align other Lister element headers with the file display border is a cosmetic option most useful when a file display toolbar is enabled. Because a toolbar is usually slightly higher than the static header, this option causes other Lister elements that are "inline" with the file display borders (like the Folder Tree's header) to be resized to match the height of the toolbar.
- Display icon lets you enable or disable the display of the Opus icon in each file display border (the icon was fixed on in Opus 10). The icon lets you create a shortcut to the current folder by drag-and-drop but you may wish to turn it off to save space.
- Enable horizontal/vertical layout button lets you
enable or disable the display of the buttons that toggle dual file displays
between horizontal and vertical layout. In Opus 10 these buttons were always
displayed, but in Opus 11 the default Menu toolbar has buttons that
perform these functions so it is superfluous to show them in the file
display border as well.
There are several new options relating to the FAYT field in Find mode (i.e. the normal mode when you type into the file display to jump to a file or folder by name):
- Highlight matches turns on the highlighting of text within filenames that matches the entered string.
- Minimize scroll to make item visible changes the way the file list is scrolled when jumping to files that are currently out of view. The normal behavior is to scroll the list as little as possible, which often results in the matching file being positioned at the bottom of the window. If this option is turned off then the list will be scrolled (if possible) far enough that the matching file is positioned in the middle of the window.
- Search anywhere in the filename enables
partial matching when searching filenames. When turned off the
entered text must match the beginning of the filename; when turned on, the
entered text can match anywhere within the filename (although priority is
still given to filenames that match at the beginning).
This page is new, although most of the options on it have been moved from the File Displays / Options page. The really new options are:
- Allow file selection when clicking to switch source/destination state is similar in nature to the Allow file selection when clicking to activate Lister option. If turned on, and you click on a file in the destination file display, the file display will be set to source and the file will be selected. If this option is turned off then although the file display would still be set to source, the file selection in that file display would be unchanged.
- The Single middle-click runs Middle double-click File Type event
option makes Opus treat a single middle-click on a file or folder
as if it were a double middle-click. For example, if you turn this
option on and configure the Middle double-click File Type event for
a folder to open it in a new tab (Go NEWTAB), you can make
Opus emulate the behavior of web browsers where middle-clicking a link opens
it in a new tab.
This page contains new options relating to the jobs bar:
- Display the jobs bar automatically when starting a new
job
If this option is turned on, the jobs bar will appear at the bottom of the Lister whenever a file operation commences. If this is turned off you can show the jobs bar manually using the Set JOBSBAR command.
- Prevent progress indicators from showing on the
taskbar
If the jobs bar is shown automatically, you can elect to remove progress indicator dialogs from the taskbar. This means that their footprints won't be added to the task bar and they won't appear in the Alt+Tab window list.
- Minimize progress indicators
If you turn this on, progress indicator dialogs will be minimized when they are opened. If the jobs bar is not used, they will still be visible on the taskbar. Use the Only when the jobs bar is visible option to only minimize them when the jobs bar is turned on.
- Resize Lister to display the jobs bar
If this is turned on, the Lister will be resized vertically, if possible, to display the jobs bar, and its size will be restored when the jobs bar closes.
- Same size buttons on the jobs bar
If this option is turned on all buttons on the jobs bar will have the same size. You can optionally configure a fixed size in pixels. Turn this off to have jobs bar buttons automatically sized based on their contents.
This option causes root-level items in the Folder Tree (e.g. Desktop, FTP, Favorites, etc) to be separated by blank space, for a less-cluttered visual effect.
The options on this page were previously found on the Folder Behaviour page.
This option affects the Calculate folder sizes automatically feature. If turned on, folder sizes will not be calculated for junctions or soft-links to folders.
If this option is turned on then the date and time columns in the file display will show the milliseconds value of file and folder timestamps as well as the seconds.
Most of the options on this page were previously shown on the Folder Display page. The only new option on this page is Ignore prefix when sorting. This is similar to the Ignore prefix option in the Folder Format editor - it lets you configure one or more filename prefixes that Opus ignores when sorting filenames alphabetically. This option takes effect globally in all file displays and also in folder trees. Multiple prefixes should be separated with a vertical bar character. For example, The |A |An would ignore those three prefixes.
Photoshop PSD files can have up to three embedded images - a small (164x164) thumbnail with very lossy compression, a full-size, flattened preview image, and the full layered image data in Photoshop's internal format (never used).
By default, the small thumbnail image is used for thumbnails and the full-size preview image is used for the viewer. The setting allows you to override this so that either image is used for both thumbnails and the viewer. If you want to have thumbnails larger than 164x164, you can tell Opus to use the preview image for thumbnails, otherwise the source image data is not large enough. However, some PSD files do not have valid preview images, so you may instead wish to tell Opus to never use them, even in the viewer. (Whether or not a PSD contains a flat preview image depends on how it was saved from Photoshop. In some cases, where there is no preview image there will be a black and white placeholder with text, written by Photoshop, telling you there is no preview image. Unfortunately, some versions of Photoshop write a corrupt placeholder image in some cases. If your workflow results in PSD files with missing or corrupt preview images, you can tell Opus to always use the thumbnails instead so you can at least get a rough idea of each file using the viewer.)
By default Listers no longer have visible resize grips, for improved cosmetics, especially in dual-horizontal with inline status bars. Grips can be turned back on using this option if you so desire.
This lets you adjust the type of output that is shown in the Script Output log (Utility Panel / Other Logs).
This lets you specify one or more characters that will be used as "word break" characters in edit fields when editing filenames (e.g. in inline rename). Word break characters affect where the cursor stops when you press the Ctrl+Left or Ctrl+Right keys. A space is always treated as a word break.
This lets you configure additional word break characters in edit fields when editing paths (e.g. in the Breadcrumbs path field). The standard path delimiters (:/\) are always treated as a word break.
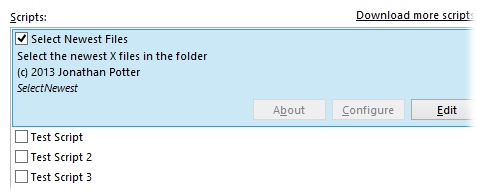
This page shows a list of any add-in scripts that have been installed. You can use the checkbox to enable or disable each script.

If you select a script in the list it reveals more information about it (a description, copyright information, and a list of the commands and events that the scripts implements). The About and Configure buttons will be active if the script supports those actions. Clicking the Edit button will open the script in your default text editor.
You can easily install new scripts by dropping them onto the Scripts list. You can also create a new script using the Create New Script command in the File menu of the Preferences dialog.
This page displays a list of any toolbar sets you have created.

Each set displays the toolbars it contains. You can rename sets and assign custom descriptions using the toolbar icons. For each set you can also use the Behavior drop-down to assign a default behavior - when the set is loaded in a Lister the default behavior will be used unless overridden on the command line. The behaviors you can choose from are:
- Add toolbars to existing toolbars - any toolbars in the set that aren't already turned on are turned on when the set is loaded. Existing toolbars are unaffected.
- Replace existing toolbars - all currently open toolbars are closed and replaced with the toolbars in the set.
- Toggle existing toolbars - if all the toolbars in the set are turned on, they are removed and replaced with the toolbars from the default set. Otherwise, any toolbars in the set that aren't currently on are turned on. This option lets you quickly toggle between the default set and another toolbar set.
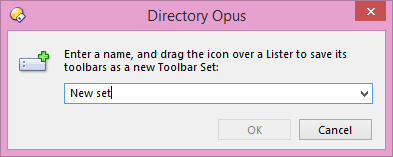
To add a new toolbar set, click the New button (
 ). The
following dialog will
open:
To create the set, enter a name for it, and then click on the
 icon and drag it out of the dialog
and over the Lister whose current toolbars you want to save into the set.