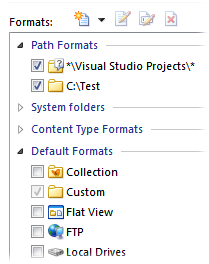
This page lets you configure the Folder Formats system, which lets you define folder formats (display parameters) for specific folders, folders containing certain types of files, or defaults for certain types of folders. For example, you can make it so that Opus automatically sorts a particular folder by date in reverse, or switches into thumbnails mode in any folder containing mostly images.
The Folder Formats system is powerful but rather complex. There's an FAQ on it at the Resource Centre that we recommend you have a read of as it may explain things in a bit more detail than this help file does.

The Formats list is grouped into different sections:
You'll notice that some formats in the list have checkboxes - this lets you turn a format on or off (in the case of Path Formats, it lets you temporarily disable a format without deleting it from the list).
Whenever you navigate to a new folder, Opus consults the Formats list to work out what format to display it with. The list is searched from top-to-bottom:
(As a side note: There are some cases when the above doesn't happen when you navigate to a new folder. If you have edited the format in the current file display with the Folder Options dialog, step 4 does not take place - your manually edited format will be maintained until you navigate to a folder with its own specific format defined. And if you have the format lock turned on, the format will never automatically change).
To edit the formats, use the toolbar buttons at the top of the page:  (add a new format),
  (edit an existing format),
  (rename a Favorite format) and
  (delete a format). Clicking the
Add button displays a drop-down menu that lets you select the
type of format to add:
As well as using the toolbar buttons, you can also:

When you edit a format Opus displays the Edit Format dialog. This dialog contains several tabs with options that control various aspects of the folder display. Each tab contains several sections and these sections can be enabled or disabled separately. When a section is disabled the options within that section are not applied to the display even when the format itself is used. This means that "more specific" formats (like a Path Format for a certain folder) can inherit settings from "more general" formats like one of the Defaults. For example, the wildcard format for Visual Studio Projects in the screenshot above does nothing except set the file display to be grouped by Date modified. The rest of the display parameters will come from the applicable default format.

The Columns tab lets you configure which information fields (columns) are displayed for the folder when the file display is in Details or Power mode. The selection of columns also has an impact on other display modes like Thumbnails - even if the columns aren't displayed, you can only sort or group by columns that have been enabled. The drop-down list at the top-right lets you select from a number of different categories of fields (if you select All you'll see there are actually quite a lot of fields, so dividing them into categories makes it a lot easier to find the one you're looking for). The fields in the chosen category that aren't currently enabled appear in the list on the left, and the enabled fields are shown on the right. To move a field from one list to another you can double-click it, drag and drop it, or use the left and right arrow buttons between the two lists.
In the list on the right, you can change the order the columns will appear in the file display by drag and drop or using the up and down arrow buttons. You can also re-order columns in the file display itself by dragging the column headers around.
The Width column in the fields list lets you specify the width for individual fields - move the mouse cursor over the column and click to edit the width setting (which is given in pixels). If no width is specified, a default width (or automatic width) is used.
The Sort column indicates which field the list will be sorted by. If a single checkmark is shown, there is only one sort field (in the screenshot above, we're sorting by Filename). If a number with an arrow symbol is shown it indicates multiple sort fields. To change the sort field, single click in column on the desired field. To assign multiple sort fields, click on the first field as normal, then hold either the Control or Shift keys and click on the second field, then the third, and so on. If you Control/Shift-click a field that is already sorted, the direction of the sort for that field only is changed - so you can for example sort by size in one direction and date in the other.
The Group column lets you choose which field (if any) the list is grouped by. To group by a particular field, click on it in this column - click again to reverse the group direction, and click a third time to turn the grouping off.
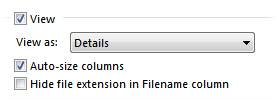
On the Display tab, the View section contains options relating to the view mode of the file display.
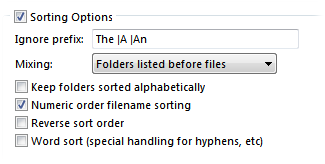
Also on the Display tab, the Sorting Options section contains options that affect the sorting of the file list (other than the actual field or fields the list is sorted by - this is specified on the Columns tab).


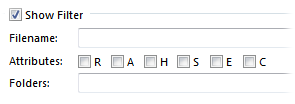
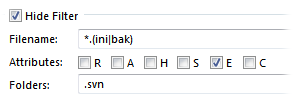
On the Filters tab are two similar sections; Show Filter and Hide Filter. They can be used to control which files and folders are shown and which are hidden when the format is applied to a folder. The Show Filter causes files to be hidden if they don't match the filter, and the Hide Filter causes files to be hidden if they do match.
The Filename and Folders field both take a wildcard string expressed using standard pattern matching. The Attributes field lets you filter files and folders based on their attributes - if any of the checked attributes are set on the item, it will match the filter and be shown or hidden as applicable. The attributes checkboxes correspond to Read-only, Archived, Hidden, System, Encrypted and Compressed.
In the screenshot above you can see that nothing has been defined for the Show Filter, but the Hide Filter is set to hide any files that end in .ini or .bak, any folder called .svn (no wildcards were used so the folder name must match exactly), and for no reason in particular, any files with the E (encrypted) attribute set.
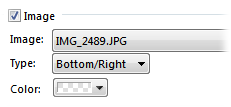
The first section on the Options tab lets you define a background image that the format will apply whenever it is active. This can be nice to use with the Content Types system; for example, you could have a background image of a music note that appears whenever the Music Content Type format is in use, as a visual cue that you are in a music folder. The Image drop-down lets you define the image to use - the images in this list are added to Opus using the Display / Images Preferences page. You can control the position of the image in the file display with the Type drop-down. The Color field lets you assign a background color for the file display that will override the color set in the Display / Colors and Fonts section. In the above screenshot, no color has been specified - this is indicated by the "transparent" checkerboard pattern.

The final section contains general Options for the format. Note that unlike the others, this section can not be turned off.

The Labels tab lets you define wildcard and label filters that only apply in this folder. The labels themselves are configured on the Favorites and Recent / File and Folder Labels page in Preferences (click the Edit labels link to be taken there automatically).
To create a new wildcard label, use the  dropdown to select
Create a new wildcard label. You can specify a pattern using
standard Opus
wildcards or regular expressions, and choose
whether to restrict the assignment to files, folders or both. The pattern can be
used to match just the filename or a whole path; for example, you could have a
wildcard pattern that matched .doc and .docx
files in your Documents folder:

You can also use filters to assign labels based on
attributes other than filename or location. To create a new label filter, use
the  dropdown to select Create a new label filter. You can create
label filters based on any
criteria supported by the filter system, although you should keep in mind
that the filter will be compared against every file in the folder - potentially
slow filter clauses like Contains should be used with caution.

The above screenshot shows a label filter that will color red any files or folders that are under SVN control and have been modified. It uses a shell column provided by TortoiseSVN to match the SVN status.